Getting started
This document provides a quick introduction to using Dynamic Documents in your application.
What we’ll do:
-
Create a simple application with DynamicFormsModule
-
Design a new document type and put it in a dataset
-
Create a document instance of that type, using the built-in admin UI
Create a new web application
To create an application with the use of DynamicFormsModule, generate an across application through the Across Initializr.
In the following sections, we’ll be using an application generated with Across 2.1.1.RELEASE and the following modules:
-
AcrossWebModule -
AdminWebModule -
AcrossHibernateJpaModule -
UserModule -
EntityModule
Add the DynamicFormsModule
Now that we have a sample application, we still need to add DynamicFormsModule. This is done by adding the dependency for the module and specifying it in the application descriptor.
<dependency>
     <groupId>com.foreach.across.modules</groupId>
     <artifactId>dynamic-forms-module</artifactId>
</dependency>@AcrossApplication(
modules = {
AcrossWebModule.NAME,
AdminWebModule.NAME,
AcrossHibernateJpaModule.NAME,
UserModule.NAME,
EntityModule.NAME,
DynamicFormsModule.NAME (1)
}
)
public class DemoApplication
{
public static void main( String[] args ) {
SpringApplication.run( DemoApplication.class, args );
}
}| 1 | Add DynamicFormsModule to the bootstrapped modules. |
If we’d now start up the application, we can see that DynamicFormsModule is bootstrapped.
INFO --- [ost-startStop-1] c.f.a.c.c.bootstrap.AcrossBootstrapper   : AcrossContext: DemoApplication (AcrossContext-1)
...
INFO --- [ost-startStop-1] c.f.a.c.c.bootstrap.AcrossBootstrapper   : 9 - DynamicFormsModule [resources: DynamicFormsModule]: class com.foreach.across.modules.dynamicforms.DynamicFormsModule
INFO --- [ost-startStop-1] c.f.a.c.c.bootstrap.AcrossBootstrapper   : 10 - DemoApplicationModule [resources: demo]: class com.foreach.across.core.DynamicAcrossModule$DynamicApplicationModule
INFO --- [ost-startStop-1] c.f.a.c.c.bootstrap.AcrossBootstrapper   : 11 - SpringSecurityModule [resources: SpringSecurityModule]: class com.foreach.across.modules.spring.security.SpringSecurityModule
INFO --- [ost-startStop-1] c.f.a.c.c.bootstrap.AcrossBootstrapper   : 12 - AcrossContextPostProcessorModule [resources: AcrossContextPostProcessorModule]: class com.foreach.across.core.AcrossContextConfigurationModule
INFO --- [ost-startStop-1] c.f.a.c.c.bootstrap.AcrossBootstrapper   : ---
Designing our document
Now that the module is present in the application, we can start using it’s functionality. The core of the module is the creation of dynamic documents, e.g. storing content in a dynamically configurable structure.
Before we can store content, we need to create the structure for storing that data, which is done by creating a definition. Different types of definitions exist for a different purpose. Currently, two types are used:
-
document: documents definitions hold the structures of our document content. Using these definitions, groups of fields can be declared to store data. -
view:DynamicFormsModuleintegrates withEntityModulethrough which various views can be defined to render data. View definitions allow these views to be modified, for example which properties should be rendered.
Create a dataset
The first step to create a document, is to create a dataset.
Datasets are logical groups of definitions, for example a dataset Job application could hold definitions for job, applicants, job titles…
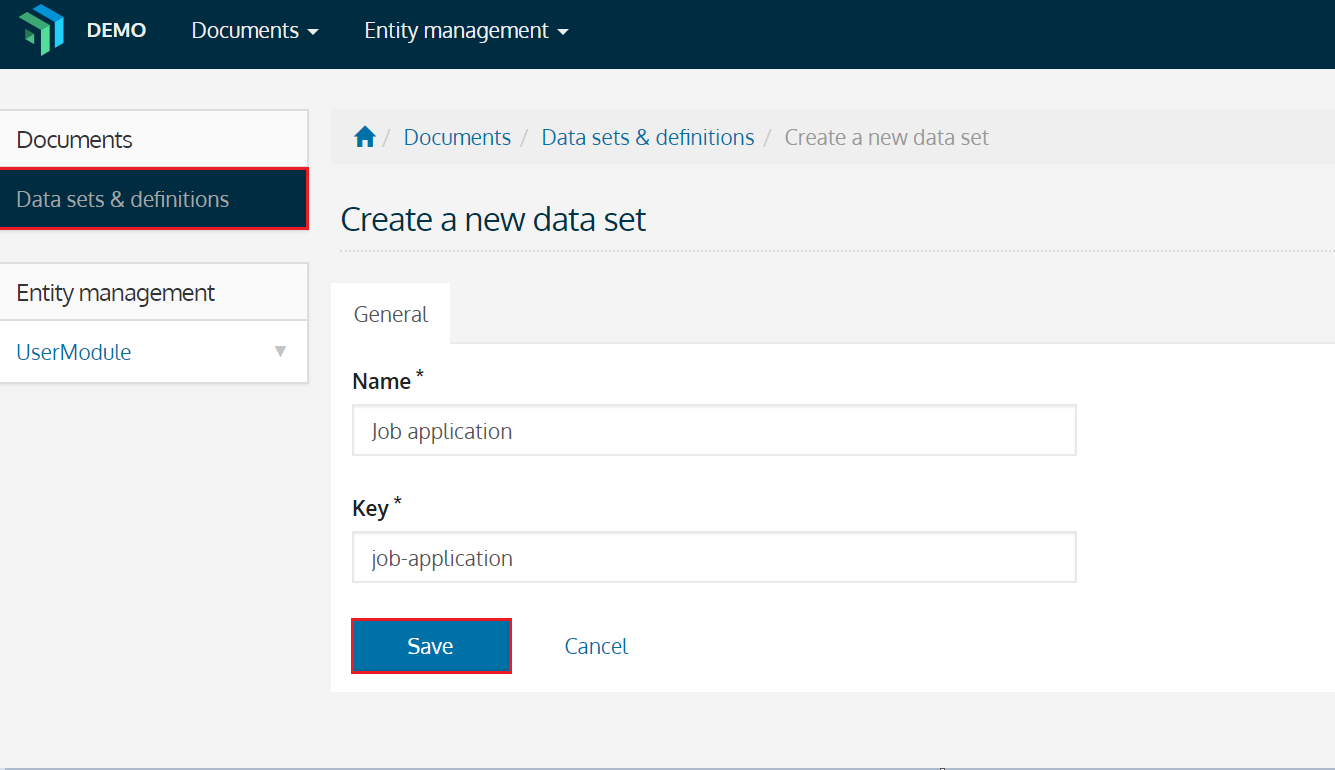
Let’s start off by creating a data set.
To do so, we’ll navigate to the menu item Data sets & definitions.
There we can create a new data set with a specific name and key, for example:
name: Job application
key: job-application
Create the document definition
Definitions can define various structures, such as the content structure for a document and the configuration of a view.
In this example, we’ll be creating a document for an Applicant, to define which information we would like to store.
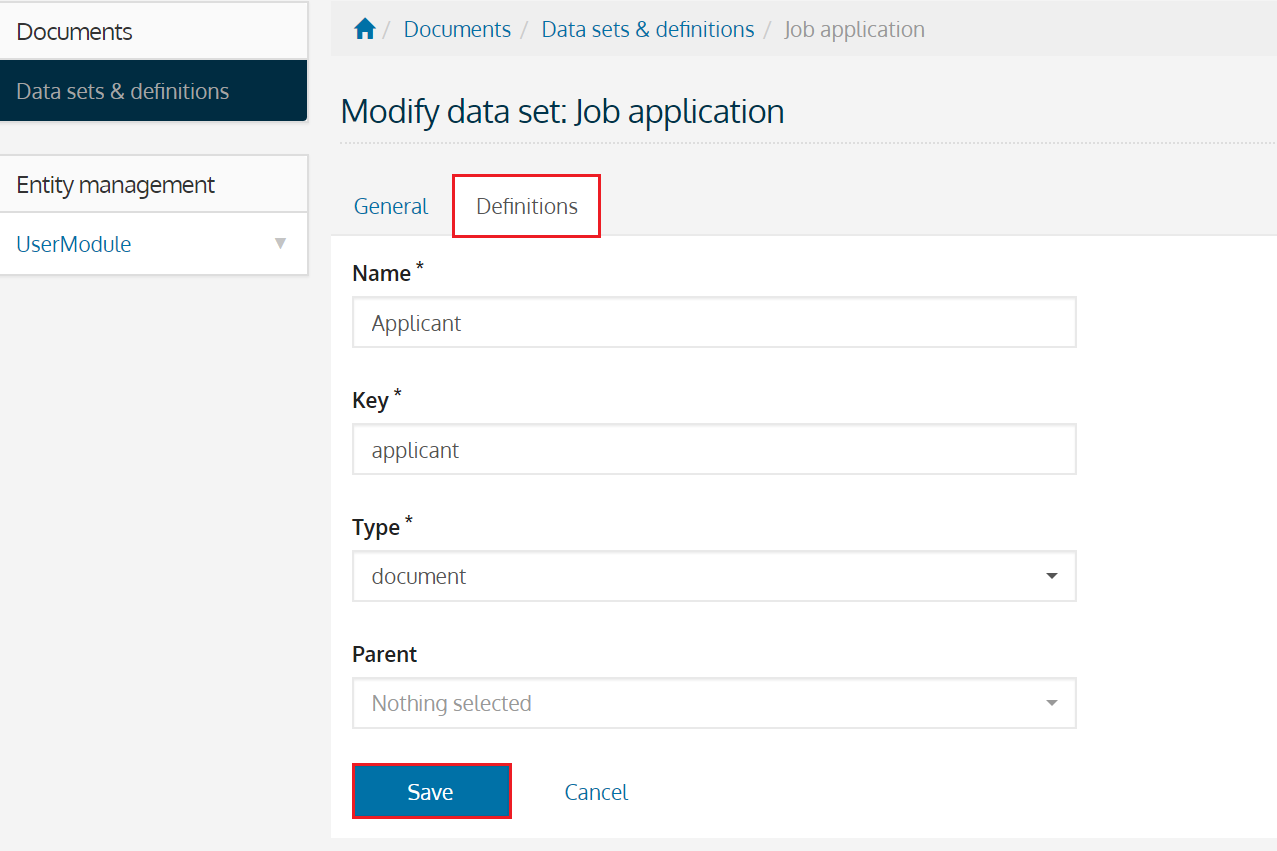
To create a definition, we navigate to the tab Definitions on a dataset, where we can start creating new definitions.
Before we can define the structure for the Applicant documents, we must create a definition of the correct type:
name: Applicant
key: applicant
type: document (1)
| 1 | We create a definition of the type document which allows us to define the document structure as a combination of various fields. |
Now, we can further modify the definition and add fields to store information.
For each applicant, we’d like to store the following information:
-
The applicant’s date of birth
-
The address of the applicant; being a combination of the street (name + house number), zipcode and city.
-
Expected monthly salary (in EUR)
-
The applicant’s motivation
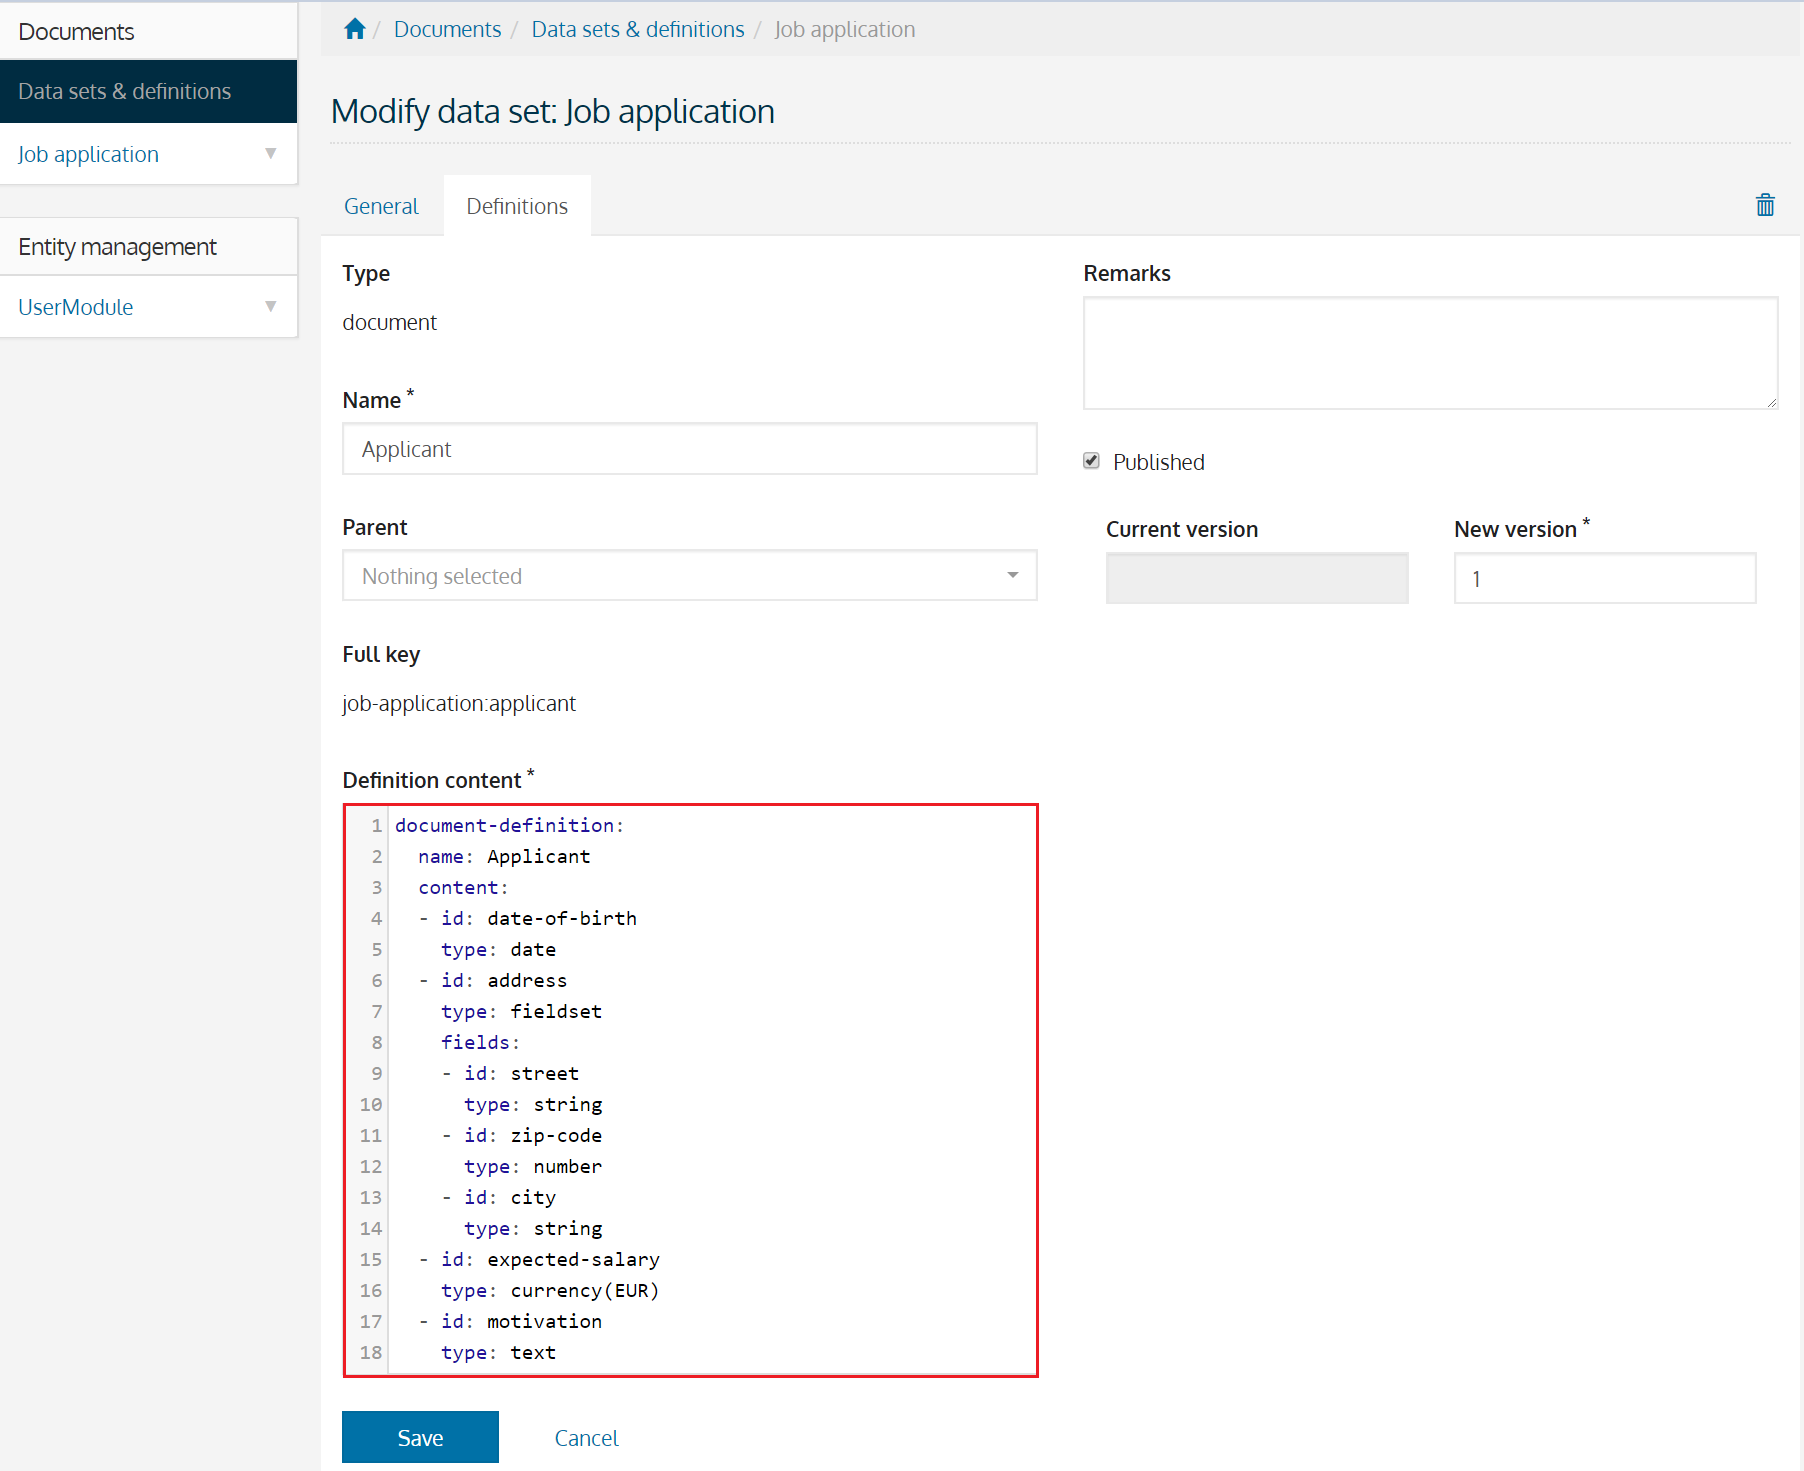
When we transform this into a definition, we end up with the following structure:
document-definition: (1)
  name: Applicant
  content: (2)
  - id: date-of-birth (3)
    type: date (4)
  - id: address
    type: fieldset (4)
    fields:
    - id: street
      type: string
    - id: zip-code
      type: number
    - id: city
      type: string
  - id: expected-salary
    type: currency(EUR) (4)
  - id: motivation
type: text| 1 | Definitions always have a root element.
In this case, we’re creating the structure for a document, for which the root element is document-definition. |
| 2 | A definition has fields which will make up the structure of the document.
These are defined in the content element of the definition. |
| 3 | Every field has an id which makes up the key under which the information will be stored.
The key for a field is a combination of the ids of field itself and its parents, with fields under the content element as root items.
In this definition, the following are examples of full keys: date-of-birth, address.zip-code and expected-salary. |
| 4 | Various types of fields are used to represent data. |
|
In the above image, we can also notice the
|
Add a document
Now that a definition is present, a menu item for our definition is automatically generated through which we can create documents for that definition. Every document for the aforementioned definition will have the structure we’ve defined, so, let’s create a document with the following information:
Name: Nancy Thompson
Date of birth: 1971/12/28
Street: Elm Street, 1428
Zip code: 8972
City: SpringWood
Expected salary: 2134
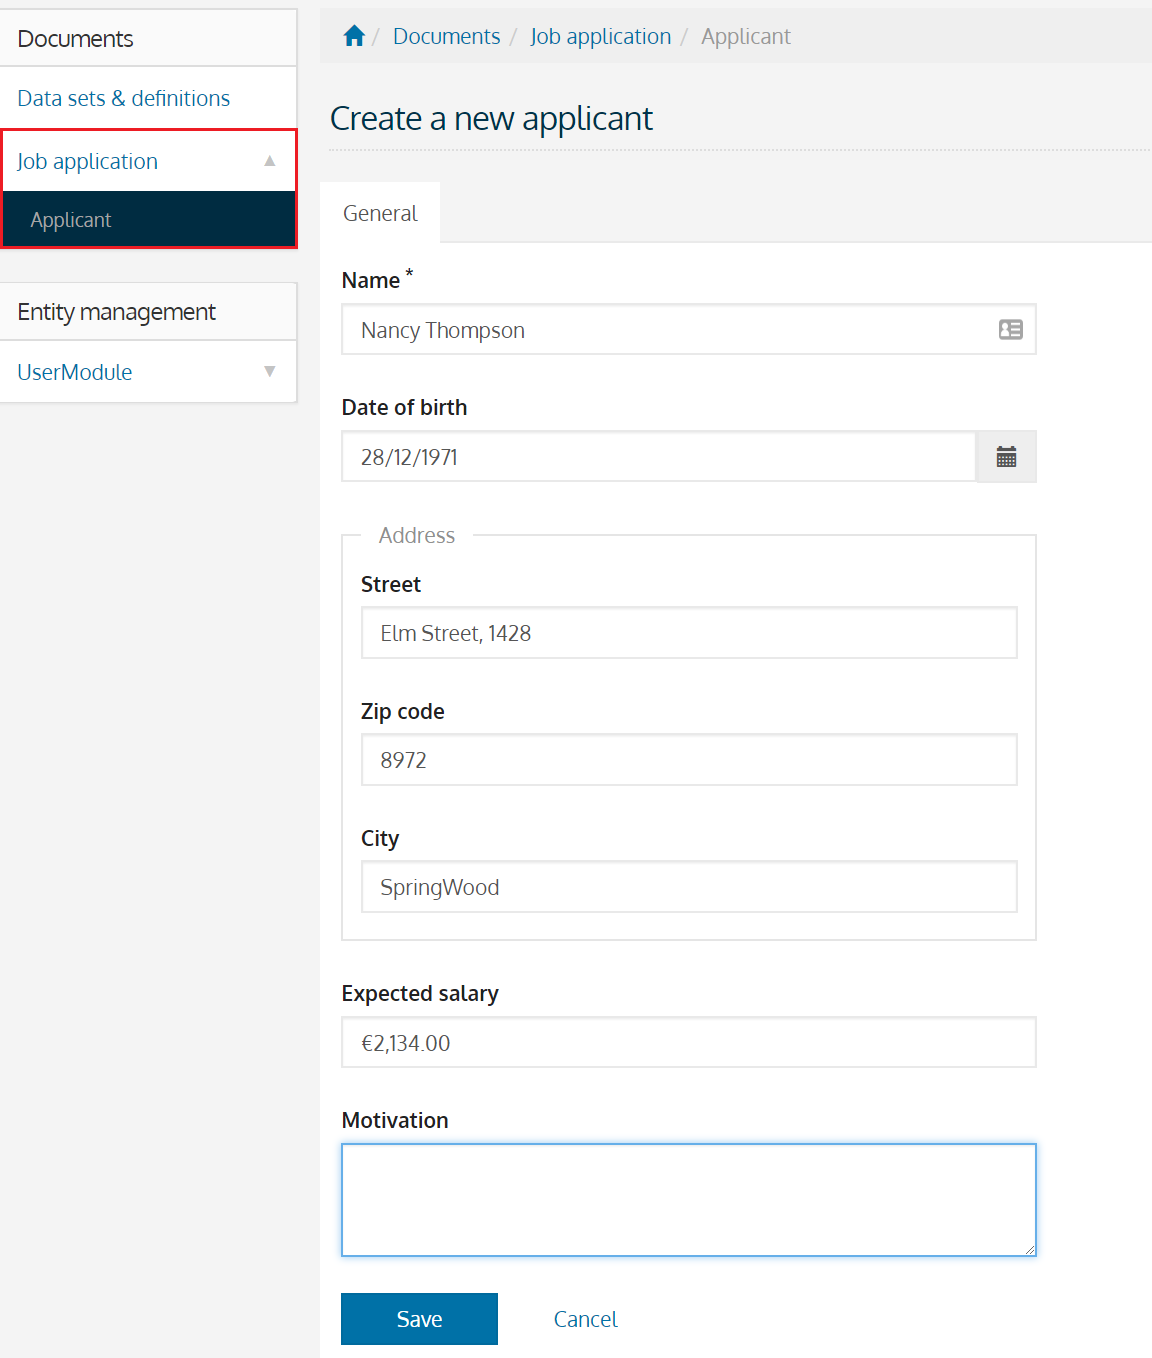
Depending on the fields we’ve defined in the Applicant definition, various fields were generated based on their field type e.g. a date control, a fieldset (to group other fields), a currency control…
The order in which they are defined, is also kept during the rendering process.
If you would reorder the fields in the definition, the new order would be applied to the document as well.
Aside of the rendering of fields, basic validation is applied as well, should you for example, attempt to submit plain text in the zip-code control or not fill in the name of the document, validation errors will occur.
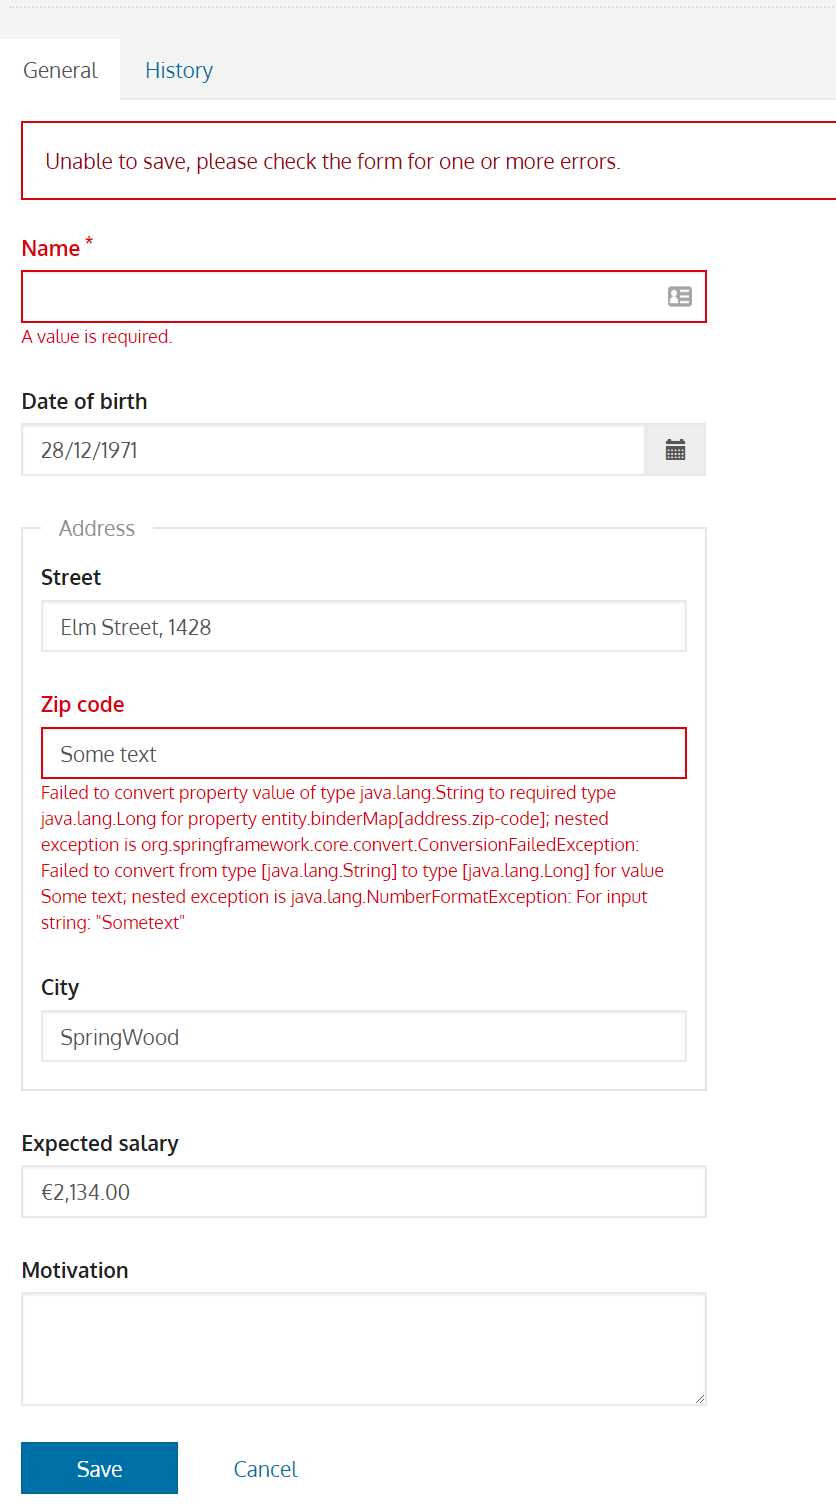
One of the fields on the document was not defined in the definition structure.
This is the field Name, which will be the name of the document itself.
|
Create a new document version
Documents are also versioned.
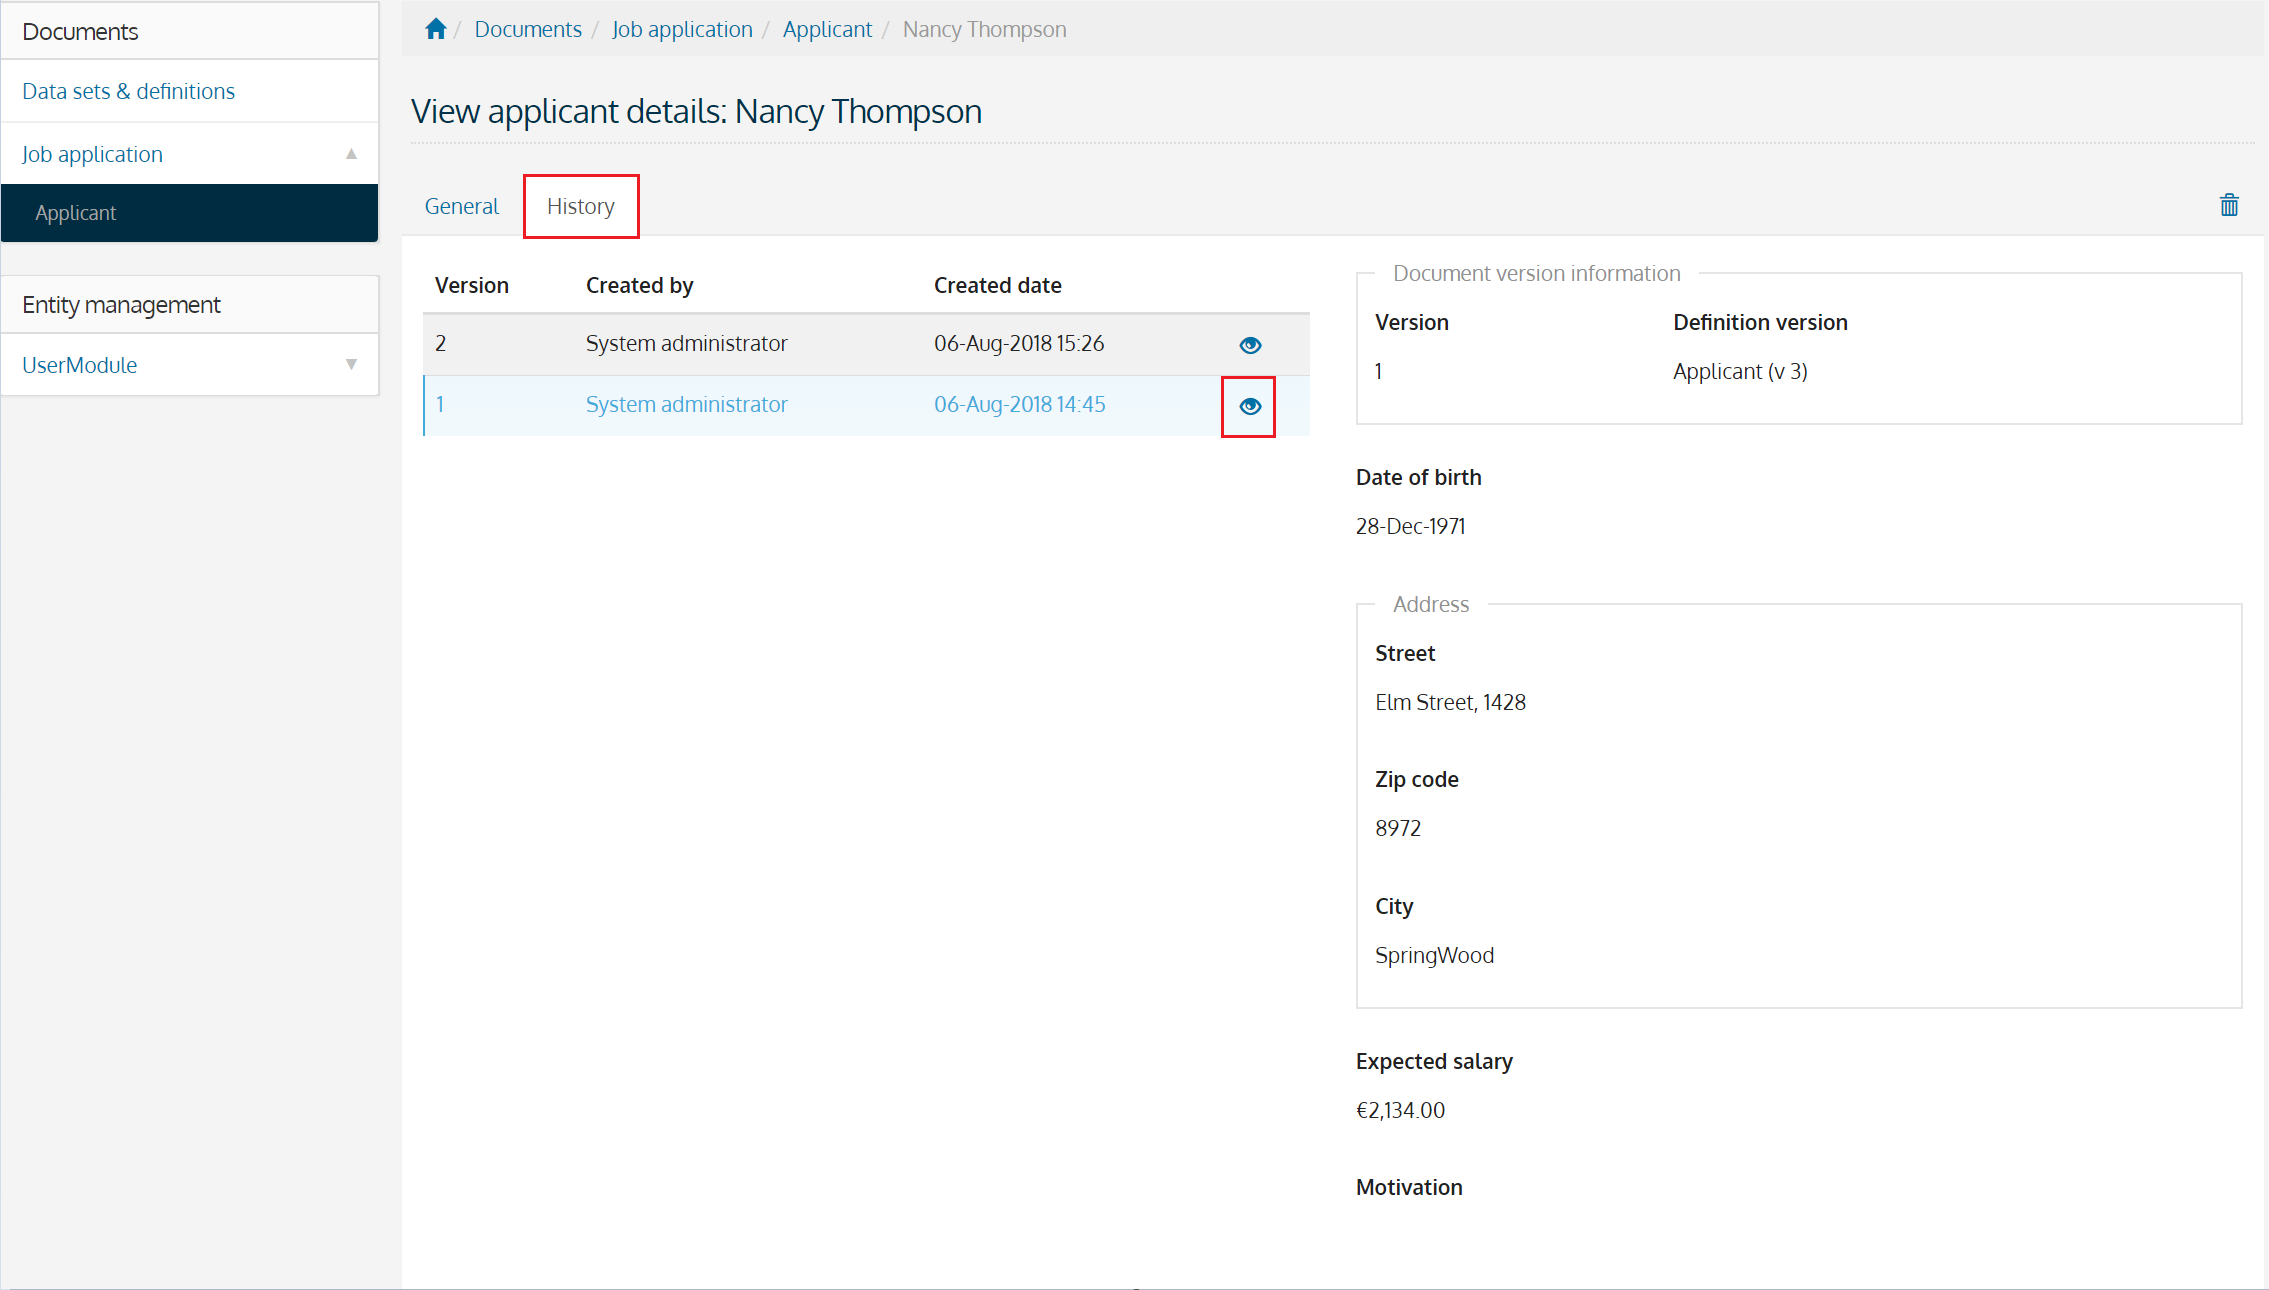
As soon as we had created our document, a History tab appeared.
The history tab provides a list of all document versions of a single document.
To illustrate a new version being created, let’s modify the expected salary from € 2134 to € 3140.
By updating the content of the document, a new version will be created with the original data and our changes.
Upon navigating to the history tab, two versions will be available, of which the details can be viewed by clicking on the eye-icon.
What’s next?
The above are the basics of how to work with definitions and documents. To learn more about how to use documents, see the chapters on Designing a document and Working with documents. For more details on configuring the fields for a definition, take a look at the field types and validators.